The MetaCommunications installation wizard will walk you through installation of your server components. Make sure you meet the following requirements, then launch the installation wizard and follow the installation prompts.
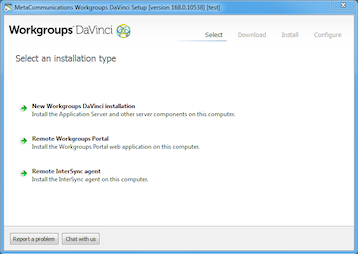
1. The first screen you’ll be greeted with when launching the installer is an option to choose what you’re wanting to install, there’s 3 options: Workgroups DaVinci Installation, Remote Workgroups Portal, or a Remote InterSync Agent. In this tutorial we’ll go through a Workgroups DaVinci Installation.
2. After Choosing your installation you’ll apply your License Certificate. You have the option to copy the license certificate from your clipboard or find the file on your server and uploading it.
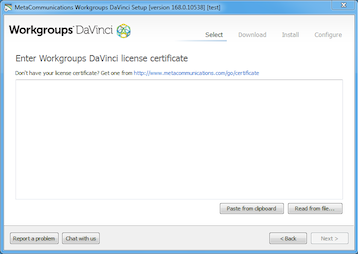
3. Once your license is applied hit ‘Next’

4. There’ll be one more screen to confirm your license, hit ‘Next’ again.
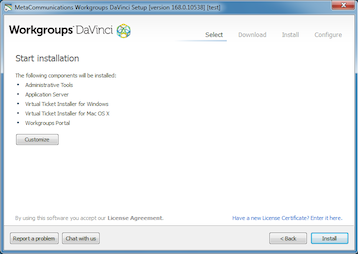
5. The following screen will give you the ability to confirm the installation and customize the installation if necessary (i.e. change the install location). Hit “Install” to start the installation.
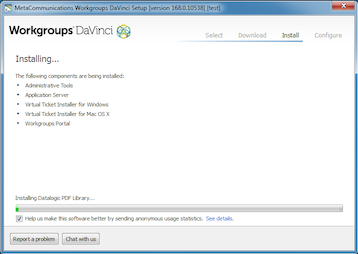
6. The install will now begin, this will take anywhere between 20-40 minutes.
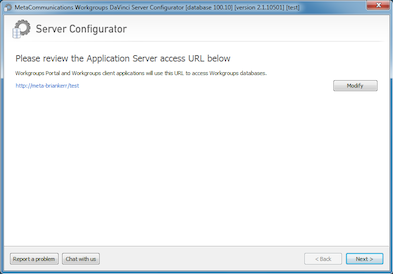
7. Once the installation is complete the Server Configurator will automatically start. The first screen in the Server Configurator will give you the option to set the URL That Virtual Ticket will be using. Once you’ve selected the URL you’d like to use hit the “Next” button.
8. You’ll now be presented with the option to either Create a New Database or Attach an Existing Database.
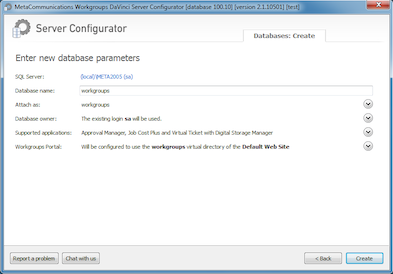
Create a New Database
9. If you choose to Create a New Database you’ll have you to Confirm your SQL Database Connection Parameters, create what you want the database name to be, choose what you want the name of the database name in Workgroups will be, enter the database login information, select your supported application (Filled from the license) and if you have a portal you’ll specify the portal configuration. Once you have all of your options selected you can hit the “Create” button.
10. The first option you’ll receive is to Enable Reporting Services, if you choose to enable Reporting Services enter your Reporting Services user information. Hit “Save” once you’ve entered all information.

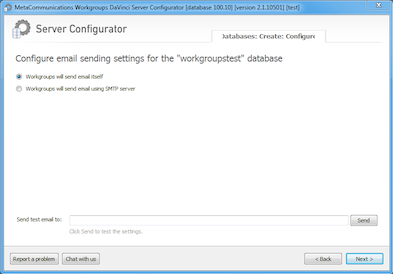
11. The next option will be to enter Workgroups email settings, you can either have Workgroups send email itself or use an SMTP server. Hit “Next” once you’ve made your selection.
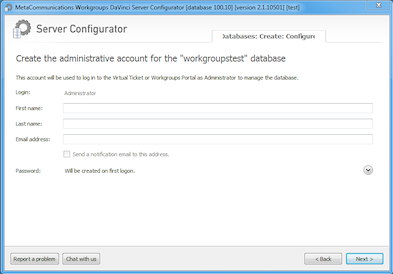
12. The final option will be to set Workgroups Administrator information, here you can set the First Name, Last Name, Email Address and Password associated with the Administrator account. Hit “Next” once you’re done entering this information.
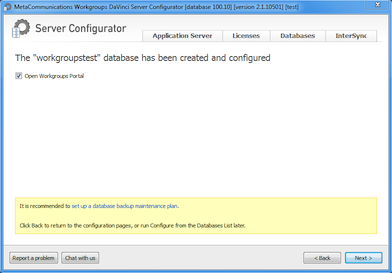
13. The last option is a Completion Screen. If you have a Portal you’ll be given an option to open the Portal upon hitting “Next”.
Attach an Existing Database
9. When attaching an Existing Database you'll be brought to a screen where you'll enter the SQL Server Information to be able to pull the listing of available databases. You'll hit 'Next' after entering that information. The next Screen will pull up a listing of available databases, select the database you'd like to attach. You'll also have the ability to change the name of the connection within Workgroups after selecting the database. Once you've selected your database hit "Attach".
10. If the database was attached on another server the database will carry over the old Portal Information, Reporting Services information and Administrator Password. To change that information select the "Configure" option next to the database name. If the database information is all correct you're done, if you'd like to Configure the database see step 11.
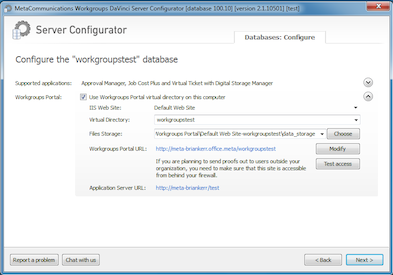
11. If you choose to configure the database further the first screen will have the Supported Applications (Filled from the license). There's also the Workgroups Portal configuration where you can select your IIS Website being used, the Virtual Directory, where the Proof Files are stored at and finally the URL the Application will be accessed from. Hit "Next" once you're done.
12. The second option you’ll see is to Enable Reporting Services, if you choose to enable Reporting Services enter your Reporting Services user information. Hit “Save” once you’ve entered all information.
13. The next option will be to enter Workgroups email settings, you can either have Workgroups send email itself or use an SMTP server. Hit “Next” once you’ve made your selection.
14. The final option will be to set Workgroups Administrator information, here you can set the First Name, Last Name, Email Address and Password associated with the Administrator account. Hit “Next” once you’re done entering this information.
16. The last Screen is a Completion Screen. If you have a Portal you’ll be given an option to open the Portal upon hitting “Next”.
Once the Configuration of the Server Configurator is complete the Application Server installation process is complete.